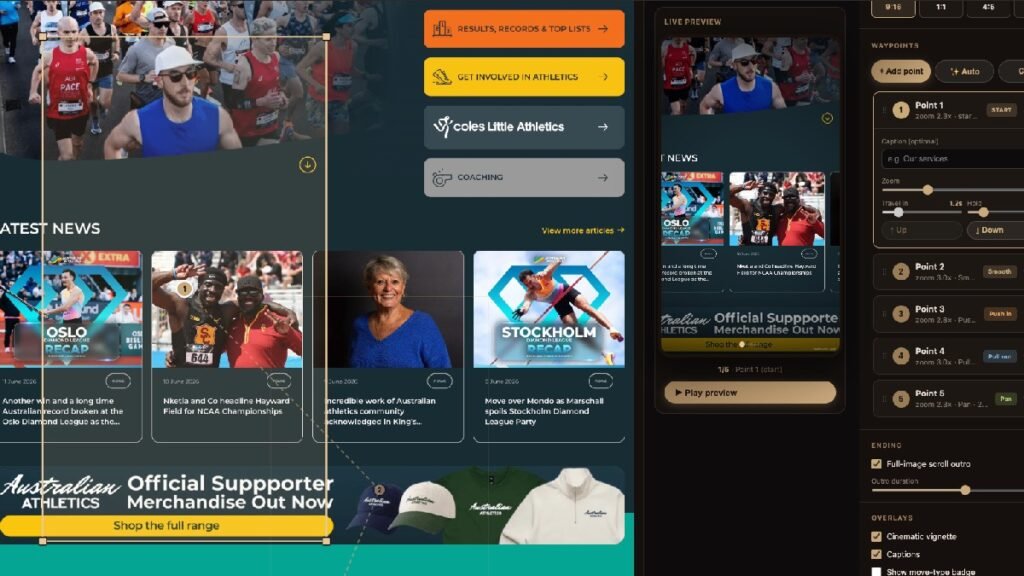
You’ve got a full-page screenshot — a landing page, a Notion doc, a pricing table, a long infographic, a thread. It looks great on a monitor and terrible everywhere else. Paste it into a social post and it shrinks into an unreadable sliver. Crop it and you lose the story.
The fix isn’t a smaller image. It’s motion. A short vertical video that glides down the page, pausing on the parts that matter, turns a static dump into something people actually watch — and it’s the native format for Instagram Reels, TikTok, and YouTube Shorts.
Here’s how to do it in a couple of minutes with ReelZoom, a free, no-signup, browser-based reel maker. Everything happens locally in your browser, so your screenshot never gets uploaded to a server.
Step 1: Capture the full page
Grab the whole page in one tall image:
- Chrome/Edge: Open DevTools (
F12) →Cmd/Ctrl+Shift+P→ type “screenshot” → Capture full size screenshot. - Firefox: Right-click the page → Take Screenshot → Save full page.
- Browser extensions like GoFullPage also work.
Don’t worry about how tall it is. A long screenshot is exactly what ReelZoom is built for — the taller it is, the more it has to work with.
Step 2: Drop it in
Go to reelzoom.app and drag your screenshot onto the upload zone (or click to browse). No account, no email, nothing to install. As soon as the image loads, the workspace opens with your screenshot on the left and a live phone-shaped preview on the right.
Step 3: Let Auto-suggest do the heavy lifting
This is the magic button. Click ✨ Auto-suggest path.
ReelZoom detects that your image is tall — anything noticeably taller than it is wide is treated as a webpage or infographic — and automatically builds the entire camera path for you. It:
- Zooms in near the top and weaves gently down the page, gliding slightly left and right so the motion feels alive instead of robotic.
- Scales the number of stops to the length of your screenshot. A short page gets a handful of waypoints; a long landing page gets many — roughly one stop per screenful of height, so nothing important scrolls past too fast (up to 20 stops).
- Eases in and out by pulling the camera back a touch at the very top and very bottom, so the reveal breathes at the start and lands cleanly at the end.
For most webpage screenshots, this single click gets you 90% of the way to a finished reel.
Step 4: Pick a feel (presets)
In the right panel, choose a Style preset. Each one tunes the speed, the holds, the motion mix, and the easing:
- Scan — steady reveal. The natural choice for a webpage: calm, even, readable.
- Cinematic — slow and elegant, for a premium feel.
- Showcase — smooth product motion.
- Energetic — fast and punchy, for a scroll-stopping hook.
Pick one and the whole path re-times instantly. The live preview updates as you go.
Step 5: Set your aspect ratio
Hit the aspect-ratio pills to match where you’re posting:
- 9:16 — Reels, TikTok, Shorts (the default)
- 4:5 — feed posts
- 1:1 — square
- 16:9 — landscape / YouTube
ReelZoom renders at ~1080p regardless of ratio, so it stays crisp.
Step 6: Fine-tune the stops (optional)
Each pause point is a waypoint, listed in the side panel and shown as a frame on your image. Tweak any of them:
- Reposition: drag a waypoint on the image.
- Change the zoom: drag a corner of its frame — tighter for a single headline, wider for a whole section.
- Add a stop: click + Add point, then click the spot on your screenshot (great for landing on a specific testimonial, CTA, or price).
- Hold longer: give text-heavy frames more dwell time so viewers can read.
- Choose the move between stops — Smooth, Push in, Pull out, Pan, Whip (with motion blur), Drift, or Cut.
- Add a caption to any waypoint to call out a feature or price.
- Reorder by dragging waypoints in the list.
You can also click Clear all and build the path entirely by hand if you want full control.
Step 7: Add the full-page scroll outro
This is the perfect ending for a webpage reel. In the Ending section, turn on Full-image scroll outro. ReelZoom finishes the video by scrolling the entire screenshot top-to-bottom in one continuous pass (default 6 seconds), giving viewers the complete context after you’ve highlighted the best parts. You can drop your logo or a closing line of text on it, too.
Step 8: Add music
Open the music picker and choose from the bundled royalty-free tracks, or upload your own. You can set the volume, pick a start point in the track, and ReelZoom automatically holds and fades the audio to match your video length. The music is mixed straight into the exported file.
Step 9: Export and post
Scrub the timeline or hit ▶ Play preview to check it. When it looks right, click ⏺ Record video.
ReelZoom renders frame-by-frame at 30 FPS — a fixed timestep, so there’s no stutter — and exports an MP4 (with a WebM fallback on browsers that can’t encode MP4 natively), music baked in. You’ll choose a bitrate for quality, then it downloads reel.mp4, ready to drop straight into Reels, TikTok, or Shorts.
Your project auto-saves to your browser, so you can come back and refine it later. You can even Export/Import the path as JSON to reuse the same motion on another screenshot.
Why this works
A long screenshot front-loads everything and asks the viewer to do the scrolling. A scrolling reel does the scrolling for them, controls the pace, and lingers on what matters — your headline, your proof, your call to action. It’s the difference between handing someone a wall of text and walking them through it.
So next time you’ve got a beautiful page that won’t fit anywhere: screenshot it, drop it into ReelZoom, click ✨ Auto-suggest path, and let it turn the scroll into a story.